| HOW TO DISPLAY YOUR PLAQUE MOUNT |
 |
|
Plaque mounts are a great alternative to framed artwork. Because the high quality prints - printed with archival, UV fade-resistant inks - are mounted directly to wood board and laminated, there is no glass to shatter or keep free of smudges. Plaques are perfect for restaurant poster art, kitchens and other areas where glass tends to get dirty, and for long term presentation of important certificates and documents.
This article explains in detail how to hang your plaque mount - whatever its size - and the best methods for keeping it in tip-top shape for years.
If you want to skip right to ordering your plaque mount, visit our Plaque Mounting Order Page.
For more information on the ins and outs of plaque mounts, check out our article, All About Plaque Mounts!
And to see the different types of wall hangers available for displaying artwork, read our Hooks for Hanging Wall Art article.
|
SUMMARY
Each plaque mount ordered from KeenART Media comes with a di-cut keyhole slot at the center back. Large pieces or panoramas will have two slots for stability and strength. Hanging your plaque mount safely and securely is easy!
| LIGHT-WEIGHT PLAQUES |
HEAVY PLAQUES |
PLACING WALL HANGERS |
CLEANING YOUR PLAQUE |
| A simple screw or nail inserted into the wall should hold most plaques weighing five pounds or less. An anchor may be needed for plaster walls. |
Some larger plaques will have multiple keyhole slots. Use an anchor for plaster walls, and choose thick, wide screws that are capable of holding a lot of weight. |
By measuring the plaque and marking the wall, nails or screws can easily be placed in the correct spot to hang the plaque exactly as needed. |
A soft, damp cloth is suitable for general cleaning of plaque mounts. A bit of dish soap added to the water will take care of more stubborn dirt. |
|
| PLAQUE MOUNTS WEIGHTS
|
 |
|
At KeenART Media, we offer plaque mounts in custom sizes that range from 4x6" to six or more feet in length. We also have various styles that use different materials, primarily different thicknesses of wood.
As a simple comparison, let's compare the approximate weight of a box or flush mount in three separate sizes:
- 12x12" (1 square foot): 1.8 pounds
- 16x24" (2.7 square feet): 5 pounds
- 36x48" (12 square feet): 21.6 pounds
Due to the variety of sizes and styles, plaque mount weights vary greatly. The following, comprehensive list shows the approximate weight of each plaque mount style, by square foot, and in the case of a 2 foot x 3 foot artwork.
For a full weight list of all our products, see the Art Material List.
|
| HANGING LIGHT-WEIGHT PLAQUE MOUNTS
|
 |
|
If a plaque mount weighs less than five pounds, it can be considered a light-weight plaque. Such pieces will generally have only one keyhole slot cut into the back.
The best option for hanging a light-weight plaque is to use a screw with a head that is no less than 1/4" wide, and no more than 3/8" wide. Drill it into the wall, but leave about 1/4" protruding.
The screw head will fit in the circular section at one side of the keyhole slot, and slide along to the center of the hanger, where it will be held securely within the wood, and be difficult to knock off the wall. To remove the plaque, simply slide it over until the screw reaches the circular section again.
Though most light-weight plaques should be fine hung on a screw drilled straight into the wall, if you are concerned about weight, you may want to place a anchor first, and drill the screw into that. Plastic anchors are useful for plaster walls, and special anchors are also available for brick.
If the plaque is very small and light, a wide-headed nail may work in place of a screw. A nail with a small head is not recommended, as it will not sit securely within the recess of the keyhole slot.
A traditional picture hanger - a flat piece of gold metal that is nailed into the wall, with a hook that drops from below the nail - can work for hanging plaques, but may not be as secure as a screw. Often, the bend in the hanger will not fit into the keyhole, so the plaque will not sit flat on the wall.
|
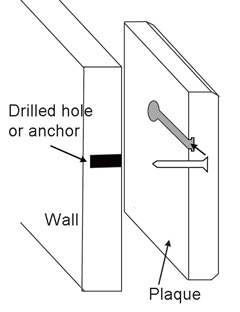
Hanging a plaque mount on the wall
|
| HANGING HEAVY PLAQUE MOUNTS
|
 |
|
If your plaque mount is very large, or a mid-sized Float or Flush (Box) Mount, a single screw that is not reinforced may not be strong enough to hold the weight of your artwork.
If your piece is to be hung on a plaster wall, you will definitely want to install an anchor in the wall before inserting your screws. Long, thick screws are ideal for heavy plaque mounts, whatever the wall materials. Be sure to leave about 1/4" of the screw out of the wall.
Most large plaque mounts will have two keyhole slots in the back, one just inside each top corner. The instructions in the next section explain how to position your wall hanging hardware to ensure it will fit neatly in the keyhole slots.
Heavy-duty two- or three-nail picture hangers may be suitable for supporting large plaque mounts. Such hooks, however, may not hold the plaque as securely. This is because the bend in the hook will not fit into the keyhole slot. The plaque is, in this case, only hanging by the slight recess at the top of the slot, and not fully secured between the two lips.
|
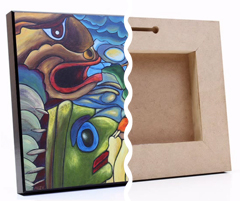
Flush mounts may be quite heavy due to the thickness of the wood.
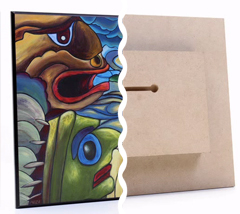
Float mounts may be quite heavy due to a double thickness of wood.
|
| PLACING THE WALL HANGERS
|
 |
|
Whatever type of hook you are using to hang your plaque, you will want to be sure it sits just where you want it to. This is especially important if your plaque mount has two keyhole slots - the hangers must be placed at the correct distance from one another to ensure the plaque will fit over both.
Placing the Wall Hanging Hardware - single keyhole:
- Measure the distance from the center of the keyhole to the top of the plaque.
- Determine the center of the plaque, and hold it up to the wall where you want to hang it.
- Using a pencil, lightly mark the wall at the top edge of the plaque, in the very center.
- Measure the pre-recorded distance down from the mark on the wall. This is where you will drill your hole.
Placing the Wall Hanging Hardware - multiple keyholes:
- Measure the distance from the center of the keyhole to the top of the plaque (A).
- Measure from the center of one keyhole to the center of the other (B). This is the distance your screws must be from one another.
- Hold the plaque up to the wall and use a pencil to lightly mark where the top will be.
- Measure down the recorded distance (A) and mark height of the screws.
- Using a level, determine the distance between the two keyhole slots horizontally along this point (B), and lightly mark each side of the measurement. This is where you will drill your holes.
|
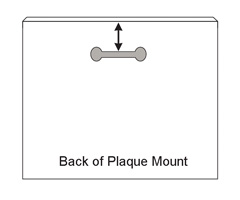
Single slot: Measure here for Step 1
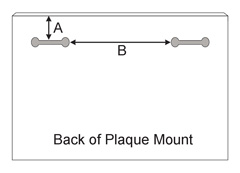
Double slots: Measure A for Step 1; Measure B for Step 2
|
| CLEANING YOUR PLAQUE MOUNT
|
 |
|
Plaque mounts from KeenART Media are sealed with a protective laminate that guards against scuffs and scratches, fingerprints, dust, moisture, and additional contaminants. Though it is non-reversible, your photograph or artwork will be safe and look good as new for decades.
The laminate makes your plaque mount easy to clean. A soft, damp cloth wiped across the surface should take care of most light dirt and dust. If the plaque is displayed in an area where it may get greasy (such as a kitchen) or exceedingly dirty, you may need to add a small amount of dishsoap into the water, to give it a deeper clean.
The laminate is strong, but we do not recommend using anything abrasive to clean your plaque mount. If paint or some other substance is dried on the face, try loosening it with warm water, and rubbing it gently with the soft cloth. Do not use a sharp blade to remove the hardened compound.
|
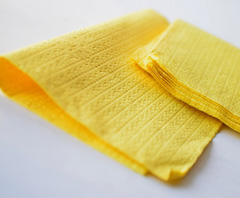
Clean plaque mounts with a soft cloth
|
|
Plaque mounts are an excellent option for a frameless and glass-free display. They are safer to hang in areas with small children, because should they fall, there will be no broken glass or splintered frame. The bevelled edge is an attractive alternative border, and the color can be selected from a variety of options. Crisp, clean, and modern, plaque mounts are a great choice for home or office decor.
If you have questions about the hows and whys of plaque mounts, or any of our services or products, don't hesitate to contact us. Our knowledgeable staff is always happy to assist with answers, advice, or suggestions.
|
|
© 2002-2026 - KeenART Media Ltd.
|
|
| |
|
